Showing posts with label bookmaking. Show all posts

Friday, November 3, 2017

Secret Journey Journal and Some Beautiful Trim


What happens when you find an old map that your brother wrapped your Christmas gift in, you are thinking about what to make for the next Artist Tribe project and The Police are singing about Spirits in the Material World and their Secret Journey in the background?

Well, this. This happens. 

Naturally. 

What else could possibly have happened? Please don't answer that question. 

So I got this idea for a map of my spiritual journey. So many spiritual artifacts are ensconced in precious boxes covered with beautiful design. I had just the thing. My old iPhone box. I can never throw them away as they are so well made. I found the bottom right away. It took weeks for me to find the top, but that is another story....

So the map was cut into pages the size that could fit in the box. 


 Gwen Lafleur's compass stencil was the obvious choice for this project. I wanted to use a color close to indigo, but alas, in my enthusiasm for pink I have neglected variations of blue. What I had, I didn't have much of. I decided to mix it with black. It actually looks like I used black, but I am happy with the way it came out. 


While pouncing the color onto the page I became transported by memories and stopped paying close attention to what I was doing. The images are not crystal clear as one might imagine, but I decided that gave it a weathered effect that was perfect for this project and moved on. 


Usually, I use a slightly harder cardboard for the cover, but I decided to actually cover the cover. For this I chose a stunning paper from Gwen's collection. I thought the black and gold suited the project perfectly. The cover cardboard was cut to the exact size of the papers, the cover 1/4 inch larger on all sides. 


Adhere the cardboard to the paper. I used gel medium. 


Trim the corners. 


 Glue them down. 


For the interior cover (also called endpapers for those in the know) I used this beautiful peacock print paper also from Gwen's shop. It looks so regal. 


Before I bound the book, I cut a piece of Dresden trim and adhered to the cover using gel medium. Lucky me, the Dresden trim was the exact size to get both front and back pieces from. 

I bound the book using the Coptic Stitch. If you are unfamiliar with the process I would recommend watching a tutorial or two on YouTube. It does take some attention, but is fairly easy to do and looks great. 


Once the book was bound, I added bits and pieces of print in different languages - Chinese that came from Gwen's shop, Japanese and Russian from an instagram friend, French from a biography about the Marquese d' Sevenge who I was researching last spring, some Italian in the hand of Leonardo D'Vinci (though I have seen it written that he wrote backwards and is suspected to have dyslexia) and Korean (some word from a favorite KPop band, Shinee.) These all reflect travels of mine, with the exception of the Russian and that simply reflects friendship.


If I hadn't already decided to make it difficult enough, I chose to do all the text in code. I love a good puzzle. I used the code pig pen if you care to have a go at it. 

I carefully assigned meaning to each page spread and made a guide to help me keep on track. I then went through buckets of old pictures, scanning them, resizing them and using an app to make them all black and white. Some looked great when outlined or cartoonized, others were better with simple black and white. I printed them out like contact paper, cut them out and adhered them to the appropriate pages. 


Thanks to Artist Tribe member Jill McDowell, for inspiring me to see things within the stencils. I found visual hints on each page to keep the meaning coming. 


Let me be real here, a book like this isn't done quickly. It's really introspective, so I decided to begin and allow myself to continue as I go. Maybe you will see the completion post someday.

A beautiful book deserves a beautiful box, nes pa? Here's how I turned my iPhone box into a treasure box. 

Gwen sent me this beautiful piece of sari material. These will be available in her shop before long, so make sure you check in. I love this piece and it was precisely the size I needed to cover the lid! 


After folding the material over the box to make sure it would fit I added gel medium to the lid and pressed it on the fabric along one of the lines. Next, I adhered the long edges. Trim the excess on the ends and stick the sides down.  


Silk is lovely, but it frays in an ecstatic, energetic sort of way. I added gell medium around the edges to make sure they did not fray. 


Let's talk about Gwen's trim for a minute. This stuff makes you drool. With so much trim to choose from how does one begin? My box side is 2" high, so I chose a trim that is 1.5" and it works perfectly. I'm guessing that will help you narrow your choices down a little bit. 

I gave a liberal coat of gel medium on the backside of the trim and carefully adhered it to the box. Clothespins placed at the corners helped to keep it secure while drying. 


So here is the rub. Iphone boxes are snug. Really snug. So I couldn't get into the box very well once I had covered it. No problem, I wanted to do something to the bottom anyway. I glued a piece of the fabric I used in my Kuchi patch brooch to the bottom of the box. 

Then I used hot glue to add sari yarn around the edge of the box. This provides a place to grip and also keeps the box from closing completely. As you can see a piece of sari yarn is used to tie the box to complete the look. 


I just don't know when to leave good enough alone. I wanted to create a secret compartment for my box. I traced the inside of the iPhone tray and cut out a piece of craft foam that size. 


I covered it in the same fabric as the bottom and then attached sari yarn all the way around. Using a button making kit from a sewing supply store, I covered a button with the last scraps of that beautiful sari scrap and sewed it to the middle of the cushion. 


Placing a gemstone bracelet there makes it look like there is nothing else to be seen here. Well, let me dream that is what it looks like. 


The reveal.


The holes in the bottom of the box are wonderful for hiding things. Currently, I have the pig pen code. No, I haven't memorized it. I also have a stick of Japanese amber incense which makes the whole thing smell lovely. I am sensitive to scent and have trouble with most incense due to an allergy to jasmine, but this works for me. You could use a drop of essential oil, some lavendar flowers or a piece of your favorite soap. 
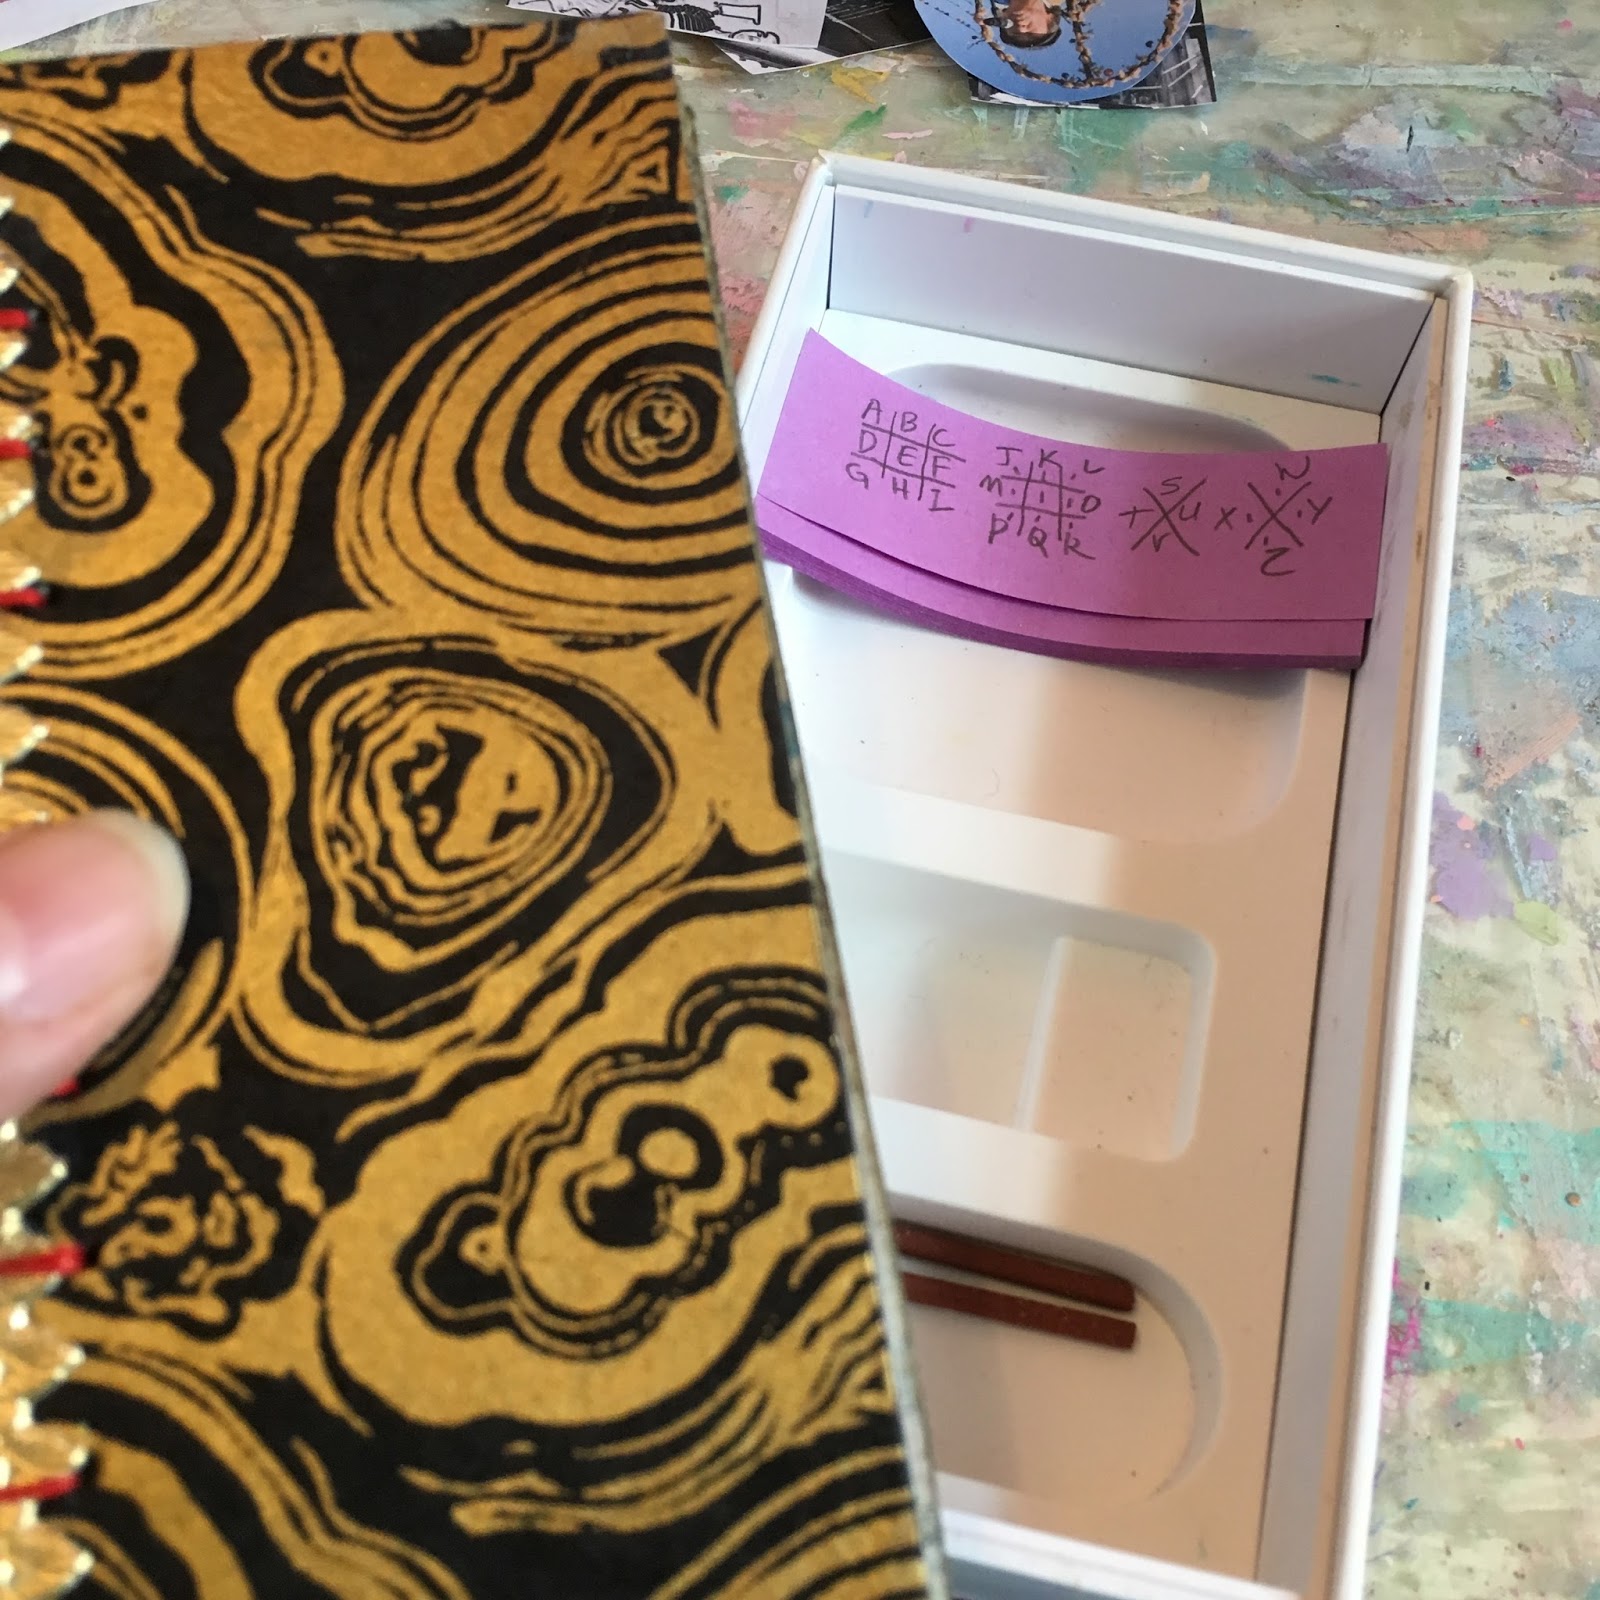

I'm sure to add more to this "secret" compartment, but I'm not going to share that with you. After all, it's a secret! 

Be sure to check out the materials I used from Gwen's shop:

Gwen's Stencil Girl Stencils - Ornamental Collection - Ornamental Compass 

Black and gold paper is from the Irresistible India Mixed Media Happy Pack

Gwen's essentials - German Dresden - Borders Assorted Patterns

Chinese paper from Exotic Orient Deluxe Collage & Embellishment Pack


Sari Ribbon from Darn Good Yarn in Twisted Sister 

And this month Gwen's having a special on trim. Go wild. This stuff is gorgeous. 


Monday, June 27, 2016

Handmade Journals and Books


For a significant piece of time the desire to make my own books has been poking at me, worrying at me, and wearing me down. One would think that by now, with all the things that tug at me in one direction or another, I would be smooth as glass like a river rock polished by the current. In May I started to act upon the whispers. (To be honest, they started as whispers, but had turned into shouting long ago.) Against all odds I decided to join the 100 day challenge and work on making books during that challenge. 

Little did I know that life would intervene. My father passed away and for a time I ceased my book making and painting. For a time other things, precious things, took my time. Not only that, but the end of the school year arrived. My creativity was harnessed in a different direction for a few weeks. 

Slowly, I am returning to the books. The contents will, no doubt, be different than if I had filled them six weeks ago. That's ok. All part of the journey. I didn't finish the 100 day project, but it did kick start me on a project that has long wished to be allowed into the light. 


The top picture shows the cover of the journal I put together immediately after sewing together. The base of this book is a JoAnn Fabrics calendar that did not find a home on the wall. The colors were lovely and the paper strong. The 2nd photo shows the cover with a layer of gesso. It is ready for some adventure. 


Inside there are some pockets made from folding over the paper. Brown paper from a purchase was added to the middle. I have always admired handmade journals featuring a variety of shapes and sizes of paper. So I tried to add it all to this journal. 


Here's a spread with three different shaped papers which have been gessoed, painted, sprayed and painted over again. 


Love the sizes, shapes and textures, but need to pull them together a bit and make them ready for what comes next. 


First step - gesso, paint, stencils, and blotting. 


Another peek at before...


... after. 

The transformation is exciting to watch. While it remains clear to me that I am the one making the transformation happen, it is still a surprise and delight to see it marinate and deepen. 

What have I waited so long for? Making books is so much fun. It is actually much easier than I imagined and the possibilities are endless. 

What have you been itching to try? What have you been putting off until the time is right, the star align and the stock market is favorable? 

Friday, July 17, 2015

Artist's Retreat - July 2015

First meal of Artist's Retreat - on the shore at Plymouth, Massachusetts. Photograph altered with Brushstroke app. 
Artist’s Retreat. Doesn’t that sound romantic? Maybe expensive? Certainly illusive.

Well, at least that’s how I felt about it. Every year I’d talk to Cindi Huss, a dear friend who has moved far enough away that we don't see each other often. We’d say how we should run away for a weekend sometime and leave all our responsibilities behind us. Well, this year I called her up and said “Let’s have an artist’s retreat!” She was enthusiastic and so we started planning. Last week was the fruit of all those conversations.


Revel in these paint colors!

We had three full days together. Cindi had seen my art journaling work and was game to give it a go. Our plan was to do gelli printing, art journaling and gelli printing on silk scarves. Cindi also brought matching white moleskins in which we would record our retreat. I found some necklace findings which allow for a picture to be inserted. We would also have these as momentos of our time together.  Our other goals included food and laughter.

Gelli Printing

We took turns. Each of us printed a few and then handed the gelli plate to the other. We never washed the plate until we were done. This method allowed us to rif on each other’s work, gave us the challenge of using what was left on the plate to create a new print and resulted in some pretty amazing pulls in which we could see traces of each other in our prints. When finished we laid out Cindi’s prints to photograph them. Then we did the same with mine. It was amazing to see how even though we had the same materials with which to work, we made very different collections of prints. It was also really fun to see Cindi’s touch in the middle of my creations.

Cindi's gelli prints. 

My Prints. Notice how different the color scheme is. 
Art Journaling

Cindi made her journal by taking large paper, applying gesso, ripping it to size and sewing together. We actually applied gesso the first day so that we could use our pages as a place to blot excess paint from brayers, paintbrushes and fingers.

I suggested the added challenge of each of us using a gelli print the other made as the inspiration for the journal page. Even as I suggested it, I quaked in my boots. Cindi took up the challenge and off we sped. We each offered up prints that we could part with which added another level of structure vs. choice. 


(Left) Cindi's print. Red was going to be a challenge for me, but those shapes! Could be leaves. Could be paisley. (Right) My print. She was already seeing things in this print.

Working with these colors was definitely out of my comfort zone. We added background color, stamping, stencils, spray ink, collage and pen. I regret neglecting to introduce Cindi to the joys of bubble wrap printing.

You can see our pages. 

What do you know? I can use red.

The shapes were taken organically from the print. I stared at it until I could see the lines in the print.

The whole page felt organic to me. It didn't take much thinking. 

Working with Cindi was great. The message came easily in her presence. She is such a fountain of joy and compassion. 

Cindi's journal page. It was fun to see her expand her vision as she added layers. 


Gelli Printing on Silk Scarves

We had seen the tutorial on the Gelli Arts blog that shows using the round gelli plates to print of silk scarves. We both reacted very positively to that idea, so we forged ahead. One of Cindi’s many talents includes dyeing fabric. Go to her website or blog to read more about her work. She had some silk scarves and offered to bring them. 


After brushing on the paint I pressed a piece of lace into the paint. Here is the result. 

This piece of lace is brightly colored now from the number of times I used it as a pattern maker. 

Cindi and I took very different approaches to this project. I started out too rigid and lifeless in my thinking. I used the blocks as the rectangles they are, marking them by pressing a piece of lace into them. 


No limitations for Cindi! She did not conform to the shape of the plate. 

Cindi printed with wild abandon. Eventually I loosened up and added the circles – big and little. The circles were made with stamps I had made from styrofoam trays my vegetables came in. Cindi’s scarf was a wild garden full of vibrant flowers and leaves.

Taking the scarves off the freezer paper was awe-inspiring. We gasped when we saw how different the scarf look as it draped around my neck or on the table.

My scarf unveiled.

Cindi wearing the scarf on the way home. 

Cindi's scarf off the freezer paper. 


Moleskine Notebooks

A silly picture we took with the APP Snap Dash. The caption reads "You're a pig being carried to a luau."

We wrote in our notebooks. What we did. How we did things. Things we wanted to remember. Food we ate. Pieces of the work we did. Photographs of us being silly. Working in these books helped us to think about what we had created and to take it to the next level. They are wonderful reminders of these days spent together and of our friendship. I will cherish mine.

Necklaces

The pieces we gave to each other. (Left) from me (Right) from Cindi.

We each chose a gelli print to cut a piece out to put in our necklaces. We each wrote a message to the other on the piece of paper we gave. Then we put them together with a piece of our own and closed the latch. Lovely charms for us to wear and shine.


It was hard to let Cindi go when the time came. Yet instead of that old feeling that things were coming to a close, I had a strange feeling that something was beginning. Guess we’ll just have to do it again. Can’t wait.


Want to see more about Cindi? You can see some of her work at http://www.cindihuss.com or her blog Dancing Threads.