Thursday, November 30, 2017

Making Holiday Gift Wrapping - Part One - A Party


I got my hands on Gwen's holiday stencils and the ideas immediately started going round in my head. I mean, look at them! And yes, those are fairy lights shining down on them. I do so love to have fairy lights shining down on my desk. 


First I stenciled on white paper. Then on a brown tag. Finally on tissue paper. The possibilities for making materials for gift wrapping were amazing. 

I couldn't keep all this goodness to myself, now could I? So we decided to have a gift-wrap making party and enjoy making our wrapping with our friends. Now I must admit that some of my friends are not all that comfortable with being asked to make things. They say things like "I'm not artistic." or "I don't make things." Usually, I nod my head and tell them that there will be refreshments and they can hang out with the other people who don't think they can do it making hot chocolate. Frankly, some of their work ends up being amazing.  

When having a party that involves paint, covering the tables with craft paper and securing with duct tape relieves those what-if-I-spill-on-the-table jitters. Frankly, I encourage people to draw on the paper. It's so much more interesting that way. 

Here's the tag I made using markers. 


One participant mimicked the poinsettia stencil using one of the makeup sponges. 


Another made stripes of color and stenciled the poinsettia over them. 


In this picture, you can see many different approaches. 


This was a careful stenciler who made beautifully crisp images. 


This friend believed she could not do this stenciling thing. Imagine a package wrapped in this! I love the colors she used. 


This friend has a mathematical and geometric sense of balance. 


Here the stencil was stamped onto paper, cut out and pasted to a large piece of paper. Paint was added on top and other elements added around it. 


More color was added ontop. 


Here it emerges. 


Brownish red paint in a spray bottle was used to spritz the stencil. Then the stencil was used with red paint to create more poinsettias. 


They were then layered and glued to the paper to create a full and dimensional work. 


The party was fun. It was especially enjoyable to see the different things my friends did with the stencils. It was a good way to gain a new perspective.

Stay tuned - That was Holiday Gift Wrapping Part One. Later this week I will reveal what I did with these stencils to make some unique gift wrapping. Hope you will come back and visit me then. 

Until then, I would love to know:
Do you make your own wrapping material?
Have you ever done it? How did it go? 
What are your favorite gift wrap go-tos? 

Sunday, November 19, 2017

Recycling Silk Threads into New Yarn


I'm wondering if this should be the first in a series of posts about how I recycle things most people would throw away. I mean, you probably would. Me? I just can't let go of certain kinds of materials. 

Point in case - these silk threads. 


I have been saving them for years. At first, I saved them because I was making paper. These threads added to paper pulp make an extraordinary paper. Simply lovely. So I had a little, zippered lunch bag that I saved them in. Now, these threads are the ones that fray off a piece of silk. Silk, that wonderous fabric! How could I let such fiber and color go? And, let's face it, silk frays around the edges like a grad school hopeful that needs those 5 more points on the GREs. There's plenty of this kind of fray if one works with silk. 

So a kind of synchronicity of events lead to the discovery of my wool carders, the silk, an old ball of yarn I spun years ago from natural wool and a wandering mind. It culminated with the box the carders was in fell off a pile, onto the floor and cracked open before my eyes. If that wasn't a sign that I should try them out again, I don't know what is. (So let it be known that I will accept any excuse to spend my time creating. I can tell quite a story, too.)

So here's how that beautiful silk looks when combed out. I added wool, and lots of it, so that there would be something to bind it together. I found that the parts where the silk ratio was too high, the whole thing fell apart. You have to have enough wool to hold it together. 


Here's the drop spindle I used to spin the yarn. I made the bottom out of fimo more than ten years ago. The dragonfly pattern in it was created by referencing a book about making colorful rolled sushi. Haven't touched this in years either, but worked like a charm. 


And here is the finished product. There is not much of it...yet. 


What I have found out is that it is possible. It works and this is something I can incorporate into my work. 


I didn't really have to spin it. I could have carded it and then used it for felting. Perhaps an easier way to make use of the materials. My mind doesn't rest. What about spinning scraps of paper into the yarn? Especially some of that beautiful stuff I get from Gwen Lafleur. I can never bear to throw away even a scrap of that stuff. 

So what say you? Does this sound like something you would do? Are you shaking your head and thinking I had better just go buy some new yarn? Like recycling? Would you like to see more articles like this? 

Wednesday, November 15, 2017

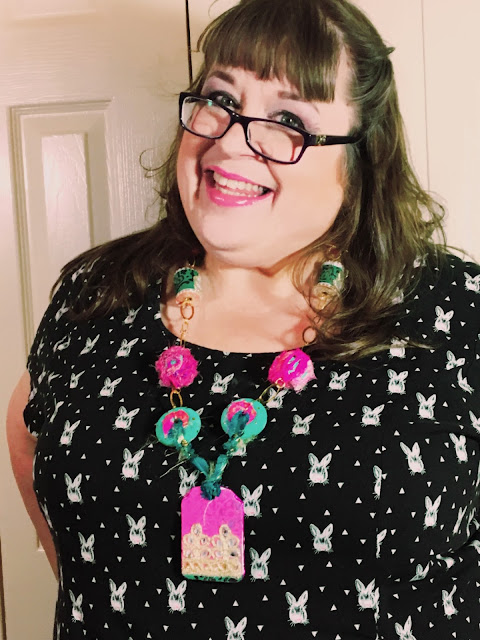
Reversible Boho Necklace - for the Artist Tribe


A reversible boho necklace to wear with more things than you would at first imagine. I've always wanted a statement piece like this one. What a surprise to me that it was easy and well within my reach to make myself. 


I know you can make one too. If you do, send me a note to let me know where you are sharing it so I can check you out. 


I knew before I started to assemble this necklace that I wanted a variety of paper with the images of Gwen's stencils. I print on reclaimed paper from gifts, packing and shopping. Most of this batch was printed on pharmacy bag paper.

I could have prepared them in a variety of ways - using a spray ink, pouncing paint upon the stencil or using artist marker. I chose the inexact and very flowy look of gelli plate printing. I simply love the process. So much loveliness to work with.


As you can see, I only use a tiny bit of it, so I have plenty left for other projects!!! 

Making the tag

These are the products needed to make the tag: 


The wooden tag - I purchased mine at Michael's.
A piece of gelli printed paper for each side. Using a separate print for each side makes it reversible. 
A piece of mirrored trim from Gwen's shop. 
A handprinted sliver of mulberry paper saved from other projects. This came in one of Gwen's paper packages. 
Gel medium to adhere the pieces.
Ranger liquid pearls - dimensional pearlescent paint -Orchid and Gold Pearl

Pink Side


1. Adhere the gelli print to the tag with gel medium.
2. Adhere the sliver of mulberry paper with gel medium.
3. Adhere the trim with gel medium.
4. Flip and do the other side. 
5. Coat the sides with the liquid pearls. Coat 3/4 of the way around. Let dry. Turn and coat the rest of the edge.

Turquoise Side


1. Adhere turquoise and white stenciled paper. 
2. Cut a piece of trim two flourishes long. Trim off the bottom section for this piece and put the flourishes aside for later. 
3. Using Ranger's Liquid Pearls add embellishment to the tag. 


Wooden Wheel Beads

I found these wooden wheels in a box I had filled fifteen years ago. Immediately using them in a necklace seemed imperative. I chose some of the gelli printed paper that used
Gwen's Ornamental Screen stencil. 

After priming them with gesso, they were painted with aqua acrylic paint. The stencils were trimmed to fit the wooden wheels. 


Adhere with gel medium. Cover with a layer of gel medium. Love these colors together.


The beads were flipped over and the glue gun was heated up. Sari yarn was glued to the indentation in the wheels.


They still looked a bit bare, so dots of Ranger Liquid Pearls were added.


Sari Yarn Wrapped Beads

1. Cover wooden bead with gesso and then paint the desired color. 


2. Thread a needle with like-colored thread. Take a stitch at the end of the sari yarn. Pull the needle through the bead


3. Pull sari yarn up to the opening and stitch through. Pull the needle back down through the hole. 


4. Pull the sari yarn back down to the bottom and take a stitch through. Continue this process until the bead is covered with sari thread. Leaving some space for the color to peek through adds vivacity. When the bead is covered to your liking take several stitches through the end of the sari yarn and trim. 


Eventually, you will use a jewelry wire to thread through the bead to attach to the chain. 


Spool beads


1. Cover spool with gesso. (Optional)
2. Cut the paper the width of the spool. 
3. Adhere paper to spool with gel medium. 
4. Add one flourish from the trim (left from a previous step) to each spool to cover the seam. 
5. Add embellishment using Ranger's Liquid Pearls - Gold  Pearl. 


Putting it all together


An old piece of sari fabric was the perfect color, so that became the hanger for the tag. A piece of sari yarn was used as the back of the neck.  The rest of the components were put together with traditional jewelry materials including some chunky chain pieces that had been looking for a purpose for many years. 


Materials used to make the necklace:
Gwen Lafleur Studios


Papers from Themed Collage Embellishment 

Gelli Arts
Gelli Printing Plate

Ranger
Ranger liquid pearls - dimensional pearlescent paint -Orchid and Gold Pearl

Golden
Regular Gel (Matte)

Hot Glue

Odds and ends from my stash (I'm so curious to hear what you find in your stash to use on a project like this!)


Credits:

Hair and makeup and portraits by the lovely Madeleine Ooka. You can find her blog, Because We Fall in Life at www.becausewefallinlife.blogspot.com and on instagram @becausewefall

All other photos by Lynda Shoup

Friday, November 3, 2017

Secret Journey Journal and Some Beautiful Trim


What happens when you find an old map that your brother wrapped your Christmas gift in, you are thinking about what to make for the next Artist Tribe project and The Police are singing about Spirits in the Material World and their Secret Journey in the background?

Well, this. This happens. 

Naturally. 

What else could possibly have happened? Please don't answer that question. 

So I got this idea for a map of my spiritual journey. So many spiritual artifacts are ensconced in precious boxes covered with beautiful design. I had just the thing. My old iPhone box. I can never throw them away as they are so well made. I found the bottom right away. It took weeks for me to find the top, but that is another story....

So the map was cut into pages the size that could fit in the box. 


 Gwen Lafleur's compass stencil was the obvious choice for this project. I wanted to use a color close to indigo, but alas, in my enthusiasm for pink I have neglected variations of blue. What I had, I didn't have much of. I decided to mix it with black. It actually looks like I used black, but I am happy with the way it came out. 


While pouncing the color onto the page I became transported by memories and stopped paying close attention to what I was doing. The images are not crystal clear as one might imagine, but I decided that gave it a weathered effect that was perfect for this project and moved on. 


Usually, I use a slightly harder cardboard for the cover, but I decided to actually cover the cover. For this I chose a stunning paper from Gwen's collection. I thought the black and gold suited the project perfectly. The cover cardboard was cut to the exact size of the papers, the cover 1/4 inch larger on all sides. 


Adhere the cardboard to the paper. I used gel medium. 


Trim the corners. 


 Glue them down. 


For the interior cover (also called endpapers for those in the know) I used this beautiful peacock print paper also from Gwen's shop. It looks so regal. 


Before I bound the book, I cut a piece of Dresden trim and adhered to the cover using gel medium. Lucky me, the Dresden trim was the exact size to get both front and back pieces from. 

I bound the book using the Coptic Stitch. If you are unfamiliar with the process I would recommend watching a tutorial or two on YouTube. It does take some attention, but is fairly easy to do and looks great. 


Once the book was bound, I added bits and pieces of print in different languages - Chinese that came from Gwen's shop, Japanese and Russian from an instagram friend, French from a biography about the Marquese d' Sevenge who I was researching last spring, some Italian in the hand of Leonardo D'Vinci (though I have seen it written that he wrote backwards and is suspected to have dyslexia) and Korean (some word from a favorite KPop band, Shinee.) These all reflect travels of mine, with the exception of the Russian and that simply reflects friendship.


If I hadn't already decided to make it difficult enough, I chose to do all the text in code. I love a good puzzle. I used the code pig pen if you care to have a go at it. 

I carefully assigned meaning to each page spread and made a guide to help me keep on track. I then went through buckets of old pictures, scanning them, resizing them and using an app to make them all black and white. Some looked great when outlined or cartoonized, others were better with simple black and white. I printed them out like contact paper, cut them out and adhered them to the appropriate pages. 


Thanks to Artist Tribe member Jill McDowell, for inspiring me to see things within the stencils. I found visual hints on each page to keep the meaning coming. 


Let me be real here, a book like this isn't done quickly. It's really introspective, so I decided to begin and allow myself to continue as I go. Maybe you will see the completion post someday.

A beautiful book deserves a beautiful box, nes pa? Here's how I turned my iPhone box into a treasure box. 

Gwen sent me this beautiful piece of sari material. These will be available in her shop before long, so make sure you check in. I love this piece and it was precisely the size I needed to cover the lid! 


After folding the material over the box to make sure it would fit I added gel medium to the lid and pressed it on the fabric along one of the lines. Next, I adhered the long edges. Trim the excess on the ends and stick the sides down.  


Silk is lovely, but it frays in an ecstatic, energetic sort of way. I added gell medium around the edges to make sure they did not fray. 


Let's talk about Gwen's trim for a minute. This stuff makes you drool. With so much trim to choose from how does one begin? My box side is 2" high, so I chose a trim that is 1.5" and it works perfectly. I'm guessing that will help you narrow your choices down a little bit. 

I gave a liberal coat of gel medium on the backside of the trim and carefully adhered it to the box. Clothespins placed at the corners helped to keep it secure while drying. 


So here is the rub. Iphone boxes are snug. Really snug. So I couldn't get into the box very well once I had covered it. No problem, I wanted to do something to the bottom anyway. I glued a piece of the fabric I used in my Kuchi patch brooch to the bottom of the box. 

Then I used hot glue to add sari yarn around the edge of the box. This provides a place to grip and also keeps the box from closing completely. As you can see a piece of sari yarn is used to tie the box to complete the look. 


I just don't know when to leave good enough alone. I wanted to create a secret compartment for my box. I traced the inside of the iPhone tray and cut out a piece of craft foam that size. 


I covered it in the same fabric as the bottom and then attached sari yarn all the way around. Using a button making kit from a sewing supply store, I covered a button with the last scraps of that beautiful sari scrap and sewed it to the middle of the cushion. 


Placing a gemstone bracelet there makes it look like there is nothing else to be seen here. Well, let me dream that is what it looks like. 


The reveal.


The holes in the bottom of the box are wonderful for hiding things. Currently, I have the pig pen code. No, I haven't memorized it. I also have a stick of Japanese amber incense which makes the whole thing smell lovely. I am sensitive to scent and have trouble with most incense due to an allergy to jasmine, but this works for me. You could use a drop of essential oil, some lavendar flowers or a piece of your favorite soap. 


I'm sure to add more to this "secret" compartment, but I'm not going to share that with you. After all, it's a secret! 

Be sure to check out the materials I used from Gwen's shop:

Gwen's Stencil Girl Stencils - Ornamental Collection - Ornamental Compass 

Black and gold paper is from the Irresistible India Mixed Media Happy Pack

Gwen's essentials - German Dresden - Borders Assorted Patterns

Chinese paper from Exotic Orient Deluxe Collage & Embellishment Pack


Sari Ribbon from Darn Good Yarn in Twisted Sister 

And this month Gwen's having a special on trim. Go wild. This stuff is gorgeous.